

Want to make the most of your buckle carrier and ensure it is as comfy for you and your child as possible? Here are some troubleshooting handy tips to help!
Before you start, check your carrier over for wear and tear, ensure the buckles aren’t broken, loosen any webbing that was left tightened, prepare anything that needs pre-clipping etc.
Work on your waistband
- Choose where to place your waistband. This will depend in part on the length of your baby’s torso (the top of their head should be at least close enough to kiss, for airway protection. or higher). This may mean you need to wear the waistband quite high when your baby is small, as free airflow is vital. As they grow longer, the waistband can move further down your body!
- Waistband-less carriers (for example, the Integra) are positioned mainly for baby’s height and may need to be quite high for little babies as their bottoms sit lower than the webbing waist.
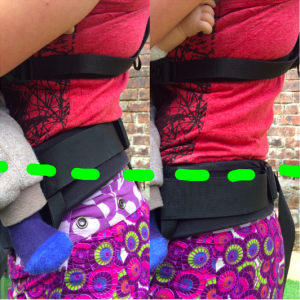
- Some people like to have the padded waistband right around their natural waist. If it is a wide or stiff band, try to have the lower end at least skimming over the top of your pelvic crests, rather than sitting on top, which may make it more comfortable.
- Some people find placing the padded waistband around the upper part of the pelvis helpful; this means that the weight does not rest on top of the pelvic crest and the waistband won’t dig in. Too low down may make it hard to walk. Try a few heights out!

- As your child grows your waistband is likely to need to move further down your body (which will also help you to see over your child’s head!)
- Make sure your waistband sits parallel to the floor rather than tipping forwards to be lower at the front. This distributes weight more evenly.
- The waistband does not need to be super tight; it just needs to be secure so it doesn’t slip.
- Ensure the buckle is fully clicked together.
- This post about babywearing with a weakened pelvic floor is worth a read, it shows some very helpful images of posture.
Practice your position
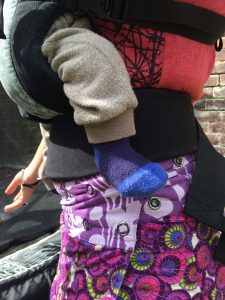
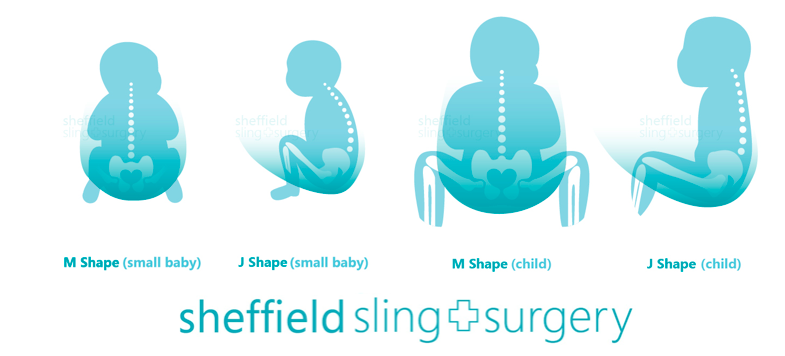
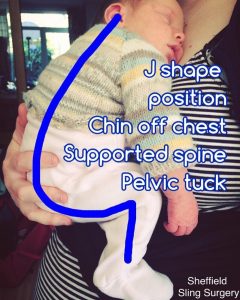
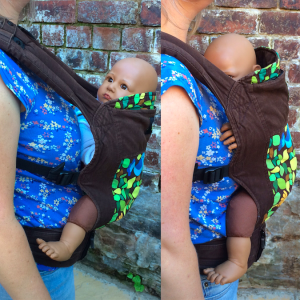
- Hold your child in the ergonomic M and J shaped position you are hoping to achieve, in the location on your body you wish them to be. It is worth taking the time to do this; it is much easier to bring the panel up over a well positioned child at the right height, rather than having to do a lot of fiddling or adjusting later. Their chest should be close to you, chin off their chest, with no slumping over. (see more here)

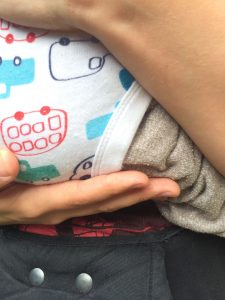
- It helps to have your child’s bottom a finger-breadth above the padded waistband. This will help to ensure the panel does not get bunched up underneath baby, which will shorten the panel. (Of course, if you are shortening the panel or using a waistbandless pouched-style carrier this does not apply).

- Hold your baby in the correct position and location with one arm, resting against you, and then with the other hand, reach underneath the panel and smooth this up your baby’s back.
- If you are using an insert, make sure your baby is positioned correctly on the seat and that little feet are not being squashed but are resting on either side of the insert.
- Ensure you have a good pelvic tuck. This maneouvre encourages your child to sit in the carrier seat with their weight resting on their bottom. not in their knee pits. It encourages their spine to curve gently and will allow them to relax into you, making carrying easier.
Sort your straps
- Weight distribution is most effective when baby’s centre of gravity is closer to yours. This can be achieved by making sure your shoulder straps are snug enough to keep your baby’s chest and tummy in contact with your front, without slumping or leaning back. This will stop your shoulders and neck and from feeling pulled forwards (and prevent your lower back from having to compensate for this strain).
- Too tight straps can be uncomfortable as well; find the happy medium.
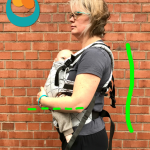
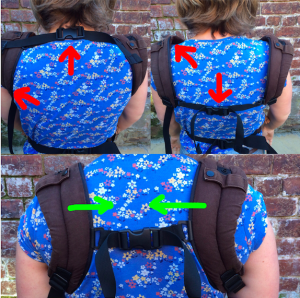
- Crossed straps that are positioned too close to the neck will be uncomfortable. Pull each strap vertically down your back and taut, before you bring it round your side to clip into the buckle. Move them further out onto your shoulder and make sure the cross is in the middle of your back before you tighten. You can use any curves that you have to help position the webbing straps and keep the cross low. Too tight straps will tend to ride up to the narrowest point.

Here is a video showing you how to fix this if you haven’t got it quite right.
- Ruck straps; the key to getting ruck straps to work is the position of the horizontal belt across the back; how high or low it sits, and the shape of the straps themselves. Too high can lead to cutting into the back of the neck, and makes the straps push up into the back of the armpits. Too low will reduce any armpit digging but can also lead to lift-off of the straps from the shoulders. Everyone has a “sweet spot” with the belt and the straps; generally somewhere in between. Get the belt right first with the help of another person, and then pull the shoulder straps snug, little bit by little bit. Pulling one side fully snug will shift the whole carrier over to the tightened side and distort the carry and be uncomfortable. This is one reason why the lift-over-the-head preclipped method of getting the carrier on can be much easier, you are not limited to a position that you can reach behind to.
Click here for a photo tutorial of this method.
Here is a video of this method.
Perfect your posture
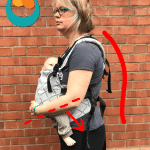
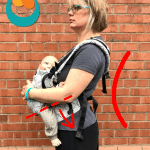
- Many of us suffer from discomfort when carrying; much of this will be down to how we stand and how well we are aligned. Addressing your musculoskeletal health is a vital part of any carrying journey, indeed it is part of your overall wellbeing. Standing with a forward slump or rounded shoulders, or with your head hanging forward, will all distort your centre of gravity. This will mean that adding a weight to your front, however well adjusted your carrier may be, will cause strain. (image from Phi Fitness)
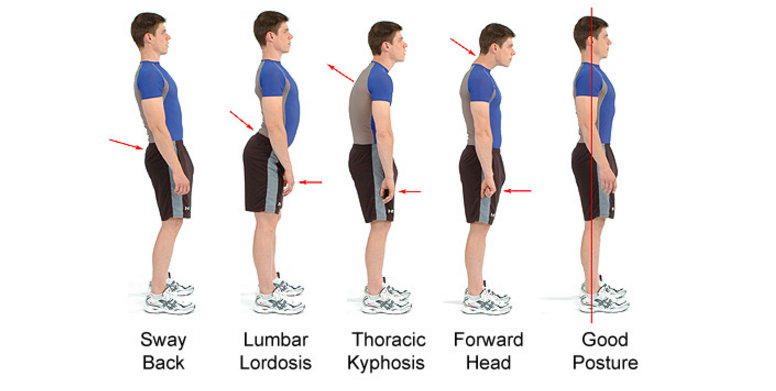
- All your major axes should be in alignment. Your head should be in line with your shoulders, and shoulders above your pelvis, which in turn is directly above your knees and ankles. It is common for people to have a pelvis that is not in neutral positioning, which significantly affects your spine and your shoulders; all our joints are connected to each other. Many of us walk with a strong forward lean due to tight calf and thigh muscles. Working on loosening these muscles to increase flexibility and adjust how we stand is very important, as is foot health.
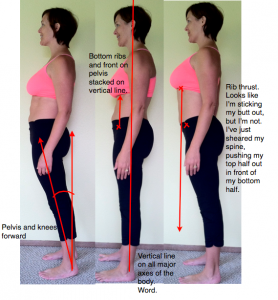
- It is worth looking at yourself side on in a mirror and watching what happens to your posture as your carrier goes on, and what it is like after ten to twenty minutes of carrying. This will help you to gradually work on how you stand as you carry and improve your comfort. (Image from Nutritious Movement/Katy Says blog)
Take your time
- Carrying loads requires a gradual build up of strength, just as training for any exercise. Muscles tone and become stronger with use. Increase the amount of time you carry your child bit by bit, massaging and winding down your muscles after any discomfort.
See your sling library for help
- you can find your local resource here www.slingpages.co.uk