
Guest blogger Amanda here. I am friend of Emily’s who has a secret passion for painting and DIY. After completing my second wall stenciling project, Emily asked me to share my process with all of you.
Disclaimer: This is the first blog I have ever written, so bear with me here.
Personalizing my house has always been an important part to me in making a house become a home. After tackling one stencil project in the house the year before, I decided to try it again but in the half bath on the main floor.
Before starting your wall stenciling project, it is important to understand the time commitment involved. The first stenciling project took me two full weekends and evenings during the week to accomplish. Due to the smaller size of the half bath, it only took me a long 3-day weekend. Be prepared to dedicate time, and patience, to this project.
Instead of purchasing a stencil like I did for my other project, (etsy is a great place to purchase stencils – the one used in the first project is the Large Wall Stencil Acanthus Trellis Allover Stencil by royaldesignstencils), I decided to make my own stencils. To do this, I had to head over to the local A.C. Moore to purchase stencil sheets (the one I purchased came with three sheets), an X-Acto Knife, a rotary cutting mat, and for ease of painting a handheld mini paint roller. I already had the paint I wanted to use, frog tape, a plastic paint tray, an ultra-fine tip sharpie marker, and a step ladder at home to also use with this project.
After having researched the design I wanted to follow for the stencils, (Barnett Gates’ Deer Damsk Wallpaper was my inspiration), I started free-hand drawing with a sharpie marker each stencil design. I decided two stencils would be needed in the planning process in order to achieve the look I wanted. After drawing the stencil designs, it was then time to cut out the design using the X-Acto Knife (on top of the rotary cutting mat).


It was then time to begin painting. Based on my design inspiration, I knew I had to start with the stag stencil. After prepping the room (moving things out of the way – I did not use a drop cloth, but you may want to use a drop cloth), I lined the stag stencil up with the floor board (for easy alignment) and used frog tape (a piece of tape in each of the top corners at a diagonal) to hold the stencil in place while I used the mini sponge roller to roll paint onto my stencil.

After each stag, I removed the stencil (with the tape still on the stencil) from the wall and placed the stencil on a piece of cardboard on the floor. I did this in case any little bit of paint somehow got behind the stencil. Waiting for the stencil and the wall to dry after each one did take some time. I would check the wall and stencil with my fingertip before moving on.
Since I chose to make a repeating stencil pattern, based on the design, I aligned the stencil to where the next stag would touch the previous stag and taped and then painted again.
The corners were the hardest and most frustrating part, so I tried my best to leave these for last. To get the stencil to lay flat against the wall in the corner so you can get your paint sponge roller (or painting instrument of choice) into the stencil openings and have it turn out perfect is an impossible task. Try your best here. Remember that you can always touch up (well, as long as you have extra base paint). Stencils are rather forgiving in that they are able to be molded with some effort to allow you to paint the pattern across the corner. I recommend not relying on frog tape here to position the stencil – hands are best (I normally helped hold it in place with one hand while I quickly applied paint with the other).
A step ladder came in very handy with the stags that needed to be painted higher up on the wall. If you don’t have a step ladder at home, a sturdy chair would work just as well.
After I finished with the stag stencil, I applied the thistle stencil according to my inspiration design pattern. I was able to apply the thistle stencil back to back without much mess, which made painting with this stencil go by much faster.
After finishing with the paint and ensuring that everything was dry, I went through and did final touch ups (I actually was continuously touching up as needed while painting each stag – I would go back to the previously painted stag and , which was dry by this point, and touch up with the base wall paint as needed). You could just wait until the end to do all touch ups.


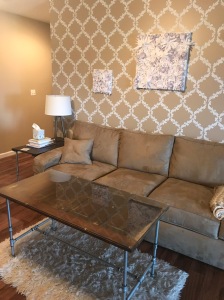
Since this is my second time stenciling a wall, I would have to say that I feel all of the time and effort is totally worth it. Although I liked the base color of the wall, adding the stencil on top added that something extra I think this half bath needed. It also was another step towards making this house feel more like home.
Some project sanity tips: I would definitely recommend having a few good music playlists or stations handy to help you pass the time. I also should admit that while waiting for the paint to dry, I did do other things throughout the house (I can’t help it I’m a multi-tasker): like some house cleaning, or catching up on some book reading. It is also okay to walk away from painting for awhile if you need a break. This is probably the most important thing to help you get through the entire project.
Well enough about me and my project, have you ever stenciled anything before, be it an accent wall, an entire room, or a piece of furniture? How long did it take you? Would you do it again? Thoughts?
~Amanda
Disclaimer: The terrible pun in the title is the handiwork of me. ~Emily

Absolutely beautiful & creative DIY!